This blog post comes from the real world. Yesterday we were producing a hybrid event for a client of ours. The audio/visual team we worked with had a streaming laptop that was having issues running VideoCom Bridge for Zoom and vMix at the same time. It was odd too - this laptop was an ASUS TUF with Nvidia graphics and plenty of RAM.
On this machine we were running Andre Savic’s awesome VideoCom Bridge for Zoom. We were mixing this feed into vMix, then streaming it all out to our online participants. But with one 720p NDI feed for the remote presenter and one feed for their screen share, vMix was reporting CPU overload.
Why?
This reminded me of a scenario I’ve seen before.

Back in 2013, I built a 3x3 display wall from a single computer and nine televisions. At a total resolution of 5760x3240, it was massive. It needed two graphics cards with six outputs each. That machine was a proper beast too - it heated my apartment, even with the windows open all the way, in -10 degree temperatures.
During the initial tests, I saw that performance was abysmal. Even at 30 frames per second, we were dropping frames. The screen was tearing.
Why?
After some poking around, I discovered the issue. In my setup, one of the GPUs was rendering each frame. That frame would then get dragged into system memory, then copied over to the other GPU.
Thirty times per second, we were rendering frames and dragging them across the system bus. Every second, over 2 gigabytes of video frames were being drawn this way.
And it was slow. The System process, which in most cases uses a negligible amount of CPU, was using close to 30% of the CPU.
This is how I learned, the painful way, about dual-GPU setups and massive memory copies. It’s also how I learned you need to be careful about how you set up your rendering engine.
What does this have to do with vMix and Zoom?
Well, it turns out this was the same problem, just on a different scale. After cracking open Task Manager, I saw that VideoCom Bridge for Zoom was using the integrated GPU to render Bridge. vMix was using the Nvidia GPU.
Each frame from Bridge would get dragged across the system bus to the Nvidia GPU.
Huge kernel times reported in the CPU monitor.
It was the same problem. But thanks to Windows 10 and 11, we have a solution: force vMix, Zoom and Bridge to render using the same GPU.
Forcing Windows to use the High Performance GPU
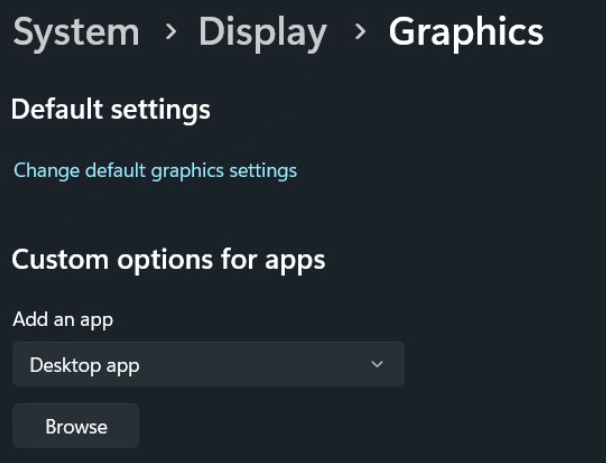
In order to force Windows to use the High Performance GPU, you need to add vMix and Bridge to the Custom Options Graphics Settings.
- Open Settings.
- Go to System - Display - Graphics
- Check to see if vMix and Bridge are present in the list.
If they are not, click the Browse button, and first add vMix to the list.
Once you have found the main vMix executable, click it in the list, and click Options. Then, select the High Performance GPU option.
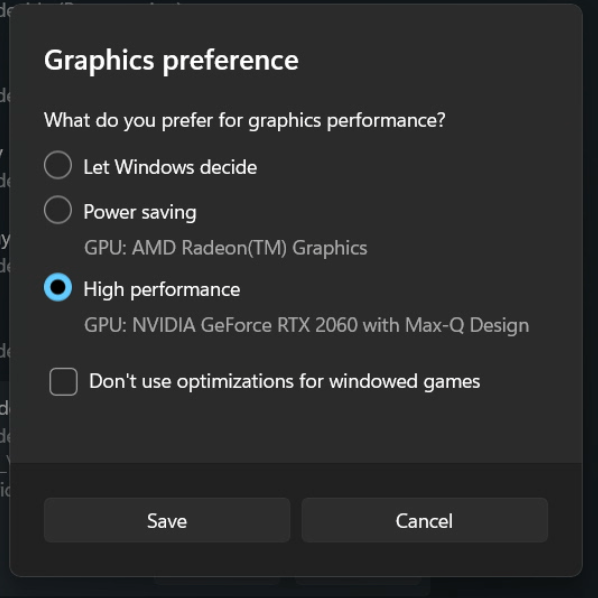
You will need to restart the application if it is running.
NOTE: Windows will use your GPU selection settings only if the path and file name match.
For Bridge, you will need to add both the launcher and the NDI application to this list. You will want to look for the executable files VideoCom Bridge for Zoom.exe and app-1.5.0\VideoCom Bridge for Zoom.exe. Both of these must be added to the list and set to use the high-performance GPU.
UPDATE: The Tractus GPU Usage Monitor
We built an application for troubleshooting and debugging GPU usage. This application reports each second the following information:
- CPU usage by core, including time spent in kernel threads
- GPU utilization, broken down by engine type
- Program-level GPU utilization